Showing posts with label project. Show all posts

Wednesday, May 22, 2013

diy project : ribbon sticks


When I was buying materials for the wedding two years ago in CA I went to LA and bought a handful of colorful satin ribbons. I bought them mainly to make our flower girl ribbon wands but I had a lot left over after the wedding. Since our anniversary was this week I thought I'd do a little decorating in our apt using our wedding ribbon. 


1. I just happen to have a couple of large dried out branches from the winter (I'm telling you - hoarder tendencies) that I had used for winter decor. First thing I did was use a stiff brush to take off any dust or dirt from the branches. Since we rent our apt I really didn't want to risk getting paint anywhere inside so I used a big box as a drying rack/splatter guard for the paint outside. 


2. I used plain ol' white acrylic paint and an old brush. I went for the solid white look but if you add a touch of water to the acrylic paint you could also achieve a whitewashed look too. If you need to walk away mid-painting wrap your paint and brushes in plastic wrap so they don't dry out. Spray paint would work for this project too. Just remember to spray in a continuous stream if you use spray paint.


3. Check out the box in action! After the first coat dries do some touch ups and a second coat if needed. 


4. While the paint dried I cut my ribbon to the length I wanted. I used satin ribbon but you could use strips of fabric too. After the branches are completely dry knot your ribbon along the branches. I always do the thicker ribbons first and do all of one color at the same time. This way it's easier to get color and size balance between your branches. 


5. Be creative with how you use the ribbon sticks. I decided to hang mine from the ceiling using twine. Our apt doesn't get a lot of natural light so having some color inside is kind of nice. That's it, enjoy!

Friday, May 3, 2013

singing in the rain umbrella


This week has been overcast and drizzly which reminds me of the movie, "Singin' in the Rain." I love Gene Kelly. In honor of the movie and because the weather inspired it I thought I'd transform a plain red umbrella into something more personalized and unique. 

First thing I had to do was remove the branding on the umbrella. Luckily there wasn't too much to remove and it all peeled nicely off the nylon. 


Next, I wrote a short portion from the "Singin' in the Rain" song lyrics and repeated it around the bottom portion of the umbrella using black permanent marker.


Last, I drew raindrops on the top portion of the umbrella using metallic silver permanent marker. That was it!


Wednesday, January 23, 2013

diy love


Happy Wednesday, everyone! I'm already thinking about the weekend....

Recently my sweet hubby came up with the great idea to rearrange some furniture and the results were wonderful but the huge wall that was once covered with the TV became bare. I thought I'd add a little seasonal flare with a Valentine's installation.

I used twisted brown paper that was used as packing material and tacked it on the wall. Sidebar: what is the deal with the overkill of packing material these days? The only part I had to be careful with was twisting gingerly on the perforated parts of the paper because it had a tendency to tear.

Next, I painted some sheets of paper green and cut them out for the leaves. Lastly, I made a few 2-finger pompoms for flowers out of baker's twine using Creature Comforts' method, here.


Tuesday, January 1, 2013

happy new year!


So, last year I did a year-in-review MadLib type exercise that was inspired from an entry on Frank Chimero's blog and it went a little something like this:
I like ____________________.
I love ____________________.
I want ___________________.
I was ____________________.
I am _____________________.
I will ____________________.
I think ___________________.
I know ___________________.
What did 2012 look like for you? Whether it was forgettable or unforgettable I hope that 2013 will be the best year to date for you and me.

Wednesday, December 19, 2012

diy pomegranate tea


I have fond memories of eating pomegranates as a kid. I would stuff handfuls in my mouth and savor each seed as it popped with juice. As I got older my mom would give me a mug full of Korean Pomegranate tea on cold winter nights. When I say "tea" I mean that in a very loose way because there are no tea leaves. It's basically preserved pomegranate syrup added to hot water. Pomegranate juice as we all know is a good source of antioxidants and in Asian cultures it is said to be very good for women in particular. Usually what the means is that it's good for women's reproductive organs or it makes you pretty haha.

This would be a great thing to have in the fridge during the cold winter months and it would also be a great gift to give.  And it just so happens that I'll be giving one batch to my boss for Christmas. If this sounds good but too much work you can also find commercially made jars of this stuff in Korean markets.  ;P

Korean Pomegranate Tea
- a sterlized and completely dried airtight vessel, I used a Slom jar from Ikea with a rubber gasket (sold separately)
- pomegranate seeds (one whole pomegranate seemed to be enough for one Slom jar)
- white sugar
- honey (optional)
- vodka (optional)

**warning: pomegranate juice will stain your clothes so be careful!
1. Sterilize your container with hot water and dry completely. Wash your rubber gasket too.
2. With clean hands open up the pomegranate and carefully release the seeds with your fingers into a clean bowl. Don't use any seeds that are brown and squishy.
3. Cover the bottom of your vessel with sugar and add a layer or seeds. Drizzle the seeds with honey if using and cover completely with a layer of sugar. Repeat until you reach the top.
4. If using vodka, carefully pour vodka until it covers the top layer. Close and refrigerate.


Essentially we are preserving the pomegranate juice with sugar and the enemy is mold. Should you find mold in your jar it means it's time to toss the batch. With time the seeds with break down and release their juice and mix with the sugar. The tiny pits in each seed will fall to the bottom and that's just fine because they're not for eating.

We want to reach the point of making a syrup with the juice and sugars. At that point we make the tea by adding this syrup to hot water. The amount of syrup is definitely to taste (I usually add about 3-4 Tablespoons) but you always want to use a clean dry spoon to retrieve the syrup so that the rest of the batch isn't contaminated. This tea is meant to be enjoyed as a winter treat (think Asian Hot Toddy) and can also be used medicinally especially if your batch has vodka. I would drink this when I had a sore throat or cough and it would give relief. If a hot drink is not your cup of tea (see what I did there?!) then this syrup would be a great addition to a winter cocktail, sparking water, or even to make your own flavored champagne.

Monday, December 17, 2012

what i'm working on : uncommon, update


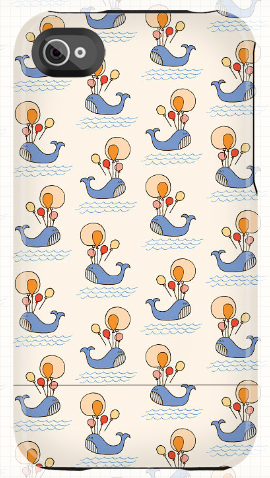
Here's an update on a previous post. During my hiatus the hubby and I changed phone services so I got an iPhone. I must say I do miss my BlackBerry's physical keyboard. It fit the hand so well and was easy to type. But still, on to the dark side I have come. One good thing was that I was finally able to order one of the iPhone cases that I had designed for Uncommon for myself. I got the iPhone 5 Deflector case with my Woodland Friends design. I think if I could do it over I would have gotten the Black Bezel Deflector case to match the black bezel around the camera area. But whatever.

Another fun update on my cases is that four of them have been picked up by Apple Europe! The four below are sold on Apple Europe websites and I assume in stores as well. If you live by an Apple store in Europe check for me! I'm really excited about it and I hope they sell well.


Tuesday, July 10, 2012

cork board makeover


Here's a fun little project that I did in one day.  I made-over an old cork board that I've had for years and years. The poor thing was looking a little drab and the holes were becoming too noticeable so I thought I'd paint it to give it new life. Here's how I did it.

Materials:
white and neon orange acrylic paint (I mixed the two to make the third color)
brushes
plastic container to hold paints
plastic bag or damp paper towel (to wrap brushes and palette when not in use to keep from drying out)
old newspapers
ruler, pencil
masking tape/painter's tape

Instructions:
1. First, paint the entire cork board and frame with white acrylic paint and let it dry.


2. Next use a pencil to mark off the measurements of how you want your board divided. I chose to divide the board three sections high and eight across but you can do whatever you'd like. As far as the colors go, follow the repeating pattern of 1, 2, 3 across each row. Assign a color to each number and follow the pattern. I chose to let 1 be the darker color, 2 the medium color, and 3 the background color (white). I pencil marked the measurements directly on the frame and on the masking tape so the pencil wouldn't show.  Just paint over the marks on the frame at the end to erase.  


3. Use masking tape to paint sections at a time. I taped off the top and bottom rows (leaving the middle row for last). Then, I taped off all the dark colors and painted them first and let it dry.  Then I did the same with the medium color. Paint several coats for an opaque look or keep it streaky like I did for more of a watercolor effect. 


4. Remove the masking tape after finishing the last row and you're done!

Friday, June 29, 2012

what i'm working on : uncommon


So I've been patiently waiting to share this with you but I have sold 6 of my designs to Uncommon which is a company that sells custom and designer iPhone and iPad cases! Order online here! Haha I'm just kidding (unless you really are in the market for a new case).  Big thanks to my friend A who works at Uncommon and opened the door for me to send in some designs.

I hope they sell well so I will be asked to submit more work ... oh, and get paid.  LOL!

Thursday, May 31, 2012

what i'm working on


So it's been a year since I got married and moved to IL and a year of being graphic design-jobless. It has been hard not being in a workplace environment. Albeit, I really don't miss the drama. LOL! I guess I miss being paid to design haha but I hope to be back working. Above is another pattern from the same family of designs from a previous post, here. I love foxes ....

And the two below have been created from some doodles made in my dusty sketchbook. 

Anyone looking to take a risk and hire a young designer? ;P


Thursday, May 17, 2012

diy wall starburst decor


First off, I'm sorry these pictures are grainy and lame. I had to use my point-and-shoot because of the focal length on my D-SLR. Anyhow, I wanted to share a quick and easy DIY room decor idea. My inspiration was from this beautiful wallpaper called Moonlight from Wallpaper Direct, pictured below.


Inspiration plus something paint chip circles and twine that I still had on-hand from Mark's birthday garland turned into a colorful starburst pattern on our bedroom wall. 


I used thumbtacks to haphazardly create the starburst pattern with twine and I taped the paint chip circles on the head of the tack. This way it's an easy DIY project that can also be taken down quick and leave the wall of our apartment relatively unblemished. This was important because I know we won't be living in this apartment forever. I want our deposit back, baby!

Saturday, February 11, 2012

happy birthday to my sweet hubby


Today my sweet Mark turns a cool 28 years old. Unfortunately the birthday boy had work today but fortunately for me it gave me a chance to decorate the apartment as a surprise when he came home. I made a colorful DIY garland out of paint chips from Home Depot (took me 3 trips to collect enough). Sadly, my sewing machine is still in CA (not sure how to ship it, bah!) so I had to string tie these puppies by hand. Sewing them would have been SOOO much easier. *sigh*


I used two different size circle punches and one with scalloped edges to make the circles and put two wrong-sides together so the ugly backside of the paint chip wouldn't show as much as possible.  Rather than being anal I decided to space them out randomly to make more of a confetti-like look. As I made my garland I kept the ends of the string long and taped one end to a stiff piece of cardboard to wrap it around as I progressed to keep it from tangling...which is the worst thing that could happen after you've spent so much time making the damn thing.

Above all I am so happy to celebrating today WITH Mark and not long distance like we did for too many years.  Happy Birthday, my sweet hubby.

Thursday, January 5, 2012

feeling the love


Ok, so it's January and the Christmas decorations are down but I'm already looking toward February because, well, it's hard to decorate the house for "Martin Luther King, Jr. Day." The bank is tight for us so I definitely don't want to buy anything to decorate the house for Valentine's.  I looked around the house and I spied 3 decks of cards in our game area.  I pulled out only the heart cards and started arranging them on our dining table to create a heart shape (it's hard to work with rectangles!).  Here's what I came up with:


I've seen people do this same idea with pictures which would be really cute, like here and here.  I'd suggest printing and cutting your pictures into squares to make your life easier.  

Sunday, January 1, 2012

happy new year!

I saw this thing on Frank Chimero's blog before.  I emailed it to myself but when I tried to search for it now I couldn't find it.  His blog changed so many times in 2011 so that's probably why.  ANYWHO, Frank Chimero is an artist that I like and I've posted his work here before.  I'm getting sidetracked again .... SO, previously on his blog Frank wrote about how he experienced this MadLib-esque list of interview questions that went as follows:

I like ____________________.
I love ____________________.
I want ___________________.
I was ____________________.
I am _____________________.
I will ____________________.
I think ___________________.
I know ___________________.

I thought it would be fun to use the format and tailor it to look back on my year and see how I'd answer those questions.  Some of the questions I had multiple answers for and others I had a harder time answering.  I wanted this record of 2011 to be honest and not too fakey positive because 1. It wasn't a perfect year and 2. That's definitely not how I roll.

I wish you and yours a very Happy New Year and all the best that 2012 can offer you.

Here's how I answered those questions....

Saturday, April 16, 2011

a sneak peek & DIY ribbon wands


The chapel coordinator where I'm getting married discouraged me from using real and even fake flower petals for my two flower girls.  She explained this is because she is often the one stuck picking up the mess.  Even though it seemed like a pretty self-serving request I didn't mind going a different route for the flower girls. 

I made two ribbon wands for the girls to shake as they walk down the aisle.  I thought it would making walking down the aisle a little more fun for them and it would be something cute for them to take home after the wedding.  Oh, and I guess it would make the chapel coordinator happy too.  Yes, I know, I'm a sassy pants. 

DIY:
I painted 6mm wooden dowels and wooden head beads with a 10mm opening that I bought from JoAnn Fabrics.  I cut long strands of ribbon and stacked them, then I put the middle of the ribbon stack on top of the end of the wood dowel and shoved the head bead over the whole thing.  The extra thickness of the ribbon filled the 4mm of empty space and kept the head bead on snug.  Super easy and simple.  Now I just need to keep the girls from stabbing people with them (they're sassy girls too). 

Thursday, March 17, 2011

Happy St. Patrick's Day


I love St. Patrick's Day.  Everyone is wears my favorite color....green.  Don't get pinched!

Related Posts Plugin for WordPress, Blogger...
Pin It button on image hover